I have fixed a problem with the hatch opener and the interior fan not functioning by re-seating the relay in it's place on the fuse panel under the dash. Now however, the same problem has occurred again. The hatch can still open by key, and the interior fan is not mission-critical, so I am considering a brand new relay or pulling it to disassemble and check the contacts and spring function. After 30+ years it's probably time for a new relay.
[Dec 2019 Update] After seating a second time and replacing a worn radiator hose, the system while running hot in stop and go traffic, is remaining cool during highway driving.
Sunday, October 27, 2019
Monday, September 30, 2019
Dyneema Rigging Pictures
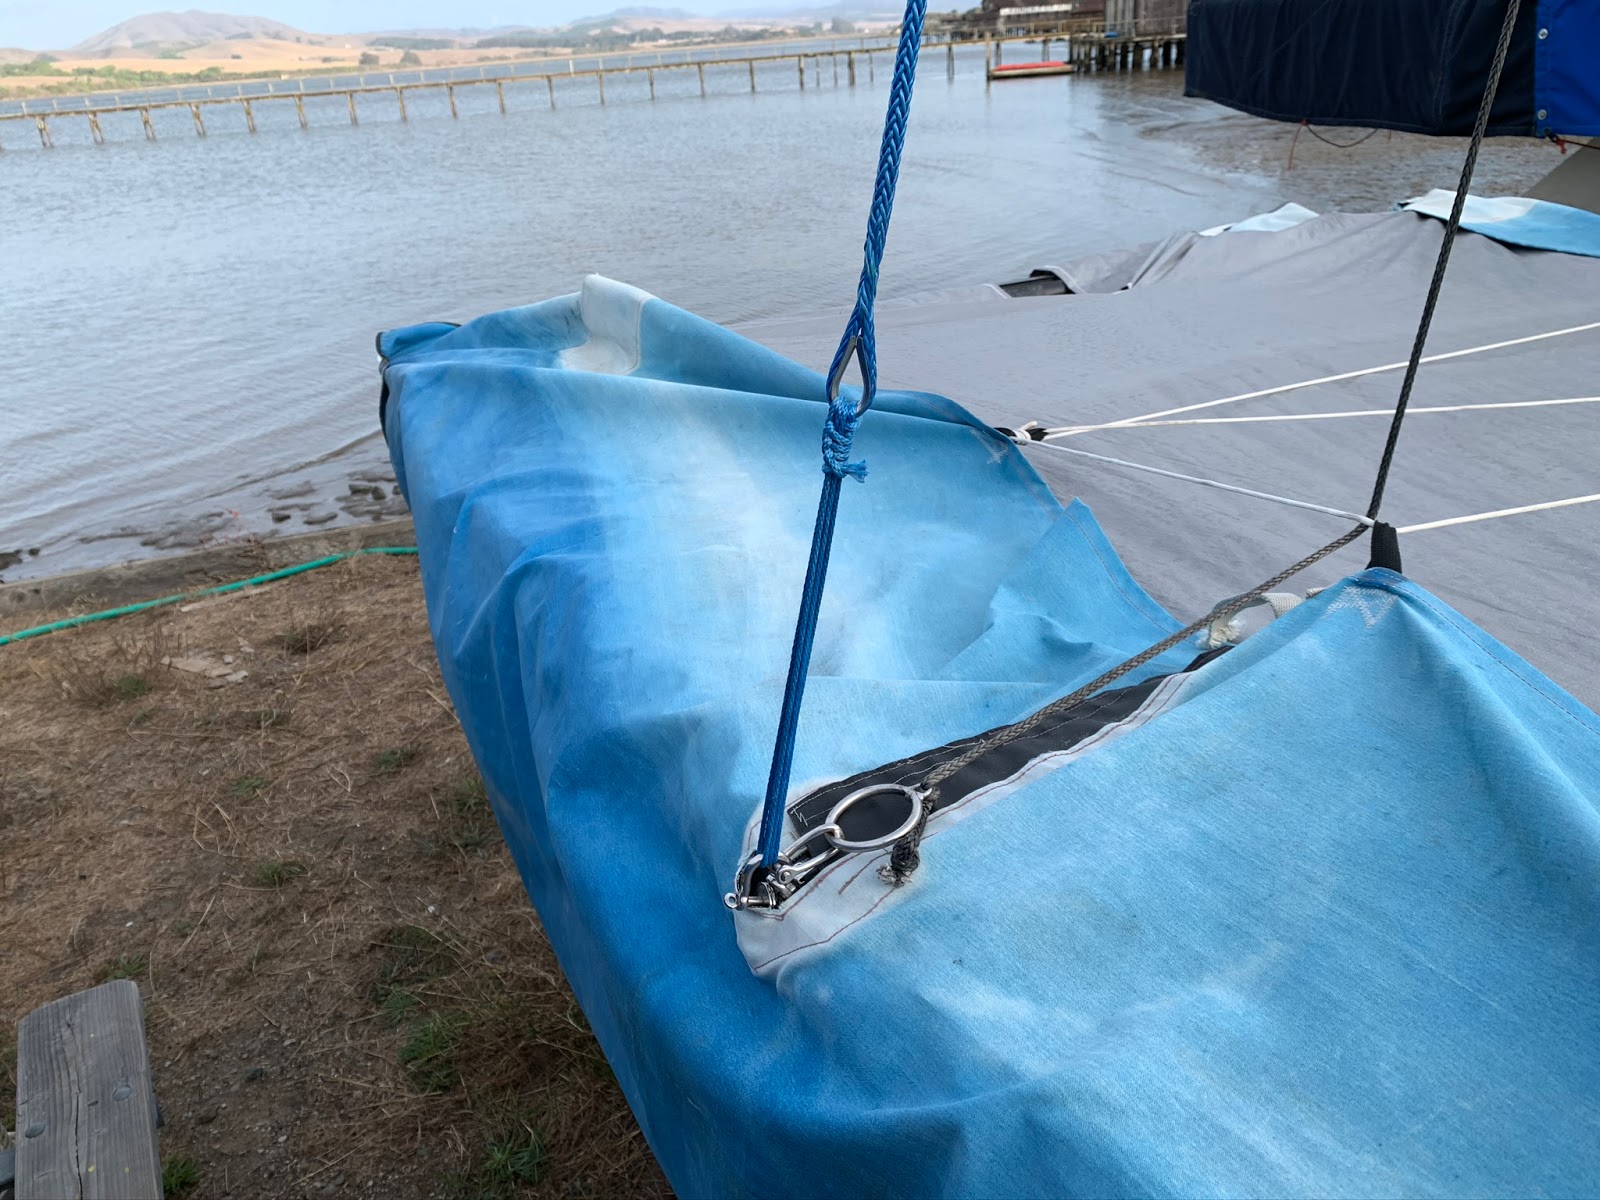 | ||
Side Stay (1/4" Brummel Splice & Thimbled both ends) with 7/64 Dyneema Lashing (3-4 turns sufficient, clove hitched)
|

 | |
| Grey colored Forestay (1/4"), Green Tangs (2 x 1/4" to furler) and sidestays (1/4") |
 | ||||||||||||||
| Lash to adjust tension. Stays straight. |
Monday, September 16, 2019
Amsteel Dyneema Stretch
[Tags: Jasmine, Hobie 20, Rigging, Dyneema]
We tried the lashing method with 1/4" Samson Amsteel Dyneema yesterday and the stretch amount was in excess of 1 foot for a 22 foot length. This is on par with the 6.67% Stretch that they show in the Samson application instructions for a 30 foot line at 2 feet of stretch. All in all, that stretch length must be factored into the line length and lashing plan. If not, you will end up with a dramatically under-tensioned rig.
On my second iteration of line length calculation, I undersized the shroud by around 1 foot, but Samson's notes would indicate that the amount should be 1.5 feet (per 22 feet) minimum. There are multiple sources of line elongation including:
-> Constructional Elogation (fibers setting into a tighter bundle)
-> Splice Elongation (strands settings into each splice - 2 in my case, one at each thimbled end)
-> Elastic Elongation (recoverable stretch in the line. recovered when load removed - small for HMPE/Dyneema)
Elongation will increase as loading increases regardless of the line construction.
Shock loading (pulsing of a load) will increase the elongation amount.
Hobie Wire Lengths (Subtract 18 inches from these figure to allow for stretch and lashing setup)
https://static.hobiecat.com/2010_archive/support/pdfs/WireGuide.pdf
Stainless Fitting Distributors
Berkley Point
Unicorn Stainless
Christine Joy
Suncor Stainless Inc.
70 Armstrong Road
Plymouth, MA 02360
(800) 541-6829
(508) 732-1013
(508) 732-9798 Fax
Friday, August 16, 2019
Porsche 924s Water-pump, Rack, Front Wheel Bearings, Engine Mounts
After I lost the Waterpump earlier this year, I took the opportunity to work on some other pending issues with "Big Red", my 1987 924S.
Water Pump purchased through Amazon - Uro model. Many bolts sheared. Used Helicoil inserts and one bolt had to be re tapped at M8 -- a massive size for such an application. Other 10 bolts remain M6, and I removed all studs.
Rack requested through South Carolina-based Rack Dr.
Testing the rack now. (Not the easiest outfit to work with) System is still moaning/groaning, but there is no fluid loss that I can identify. (reservoir remains full)
Update 10/2019: Rack appears to be functioning correctly, although the alignment of the splined turn gear seems to be off in a way that prevents the original bolt (M8) from fitting. I substituted a M6 to get clearance to install and have kept my original rack (not the moaning culprit as it turns out) if I need to in the future.
Alignment performed after installing the rack
Engine mounts from Uro installed (Amazon or Pelican)
Control arm ball joints replaced. (Pelican)
Tie rod ends replaced. (Pelican)
Fuel Jumper line replaced (Pelican) - alleviated fuel smell for now
New Sway Bar Bushings (Pelican)
At this time, the Power steering pump is being suspected as the moaning/groaning source as I've replaced every other component in the system including new lines (with exception of the fluid cooler) and a rebuilt rack. Additionally, following my alignment, I need to tighten the tie rod end nuts as those were reported loose. (now done, but still hearing a popping sound when turning under load)
Information Sources Used:
(1) Clark's Garage (Great man with a huge contribution to 944 owners everywhere. Rest in Peace Clark)
(2) Front Wheel Bearings (Floating Frame Calipers)
https://www.youtube.com/watch?v=apBUNIl4HNw&t=425s
Update: Clunking Noise when steering
10/4/19 Update: I've noticed a clunking sound after installing the new front suspension. The root cause appears to be the suspension ball bearing which I regreased and light sanded some galling on the inner race which abuts the strut shoulder. Seems to have fixed the issue in my trials. Pelican/Porsche wants $107 per side new for these rubber with bearing assemblies -- better to make the old ones last.
Getting alignment done was a $200 exercise because they figured out that it was a Porsche -- I don't think that they even touched the camber for that price.
Update: Clunking Solved by grease-packing front strut bearing.
10/12/19 Update: The clunking was fixed by removing the left strut and repacking it's bearing with grease.
Tuesday, July 30, 2019
1st Oshkosh
 |
| One of the many fly-overs |
 |
| Icon Aircraft is based in Vacaville CA, and assembles there. Many Components built in Tijuana, Mexico |
 |
| Attention to detail |

 |
| Long-Easy resting nose down to avoid tipping backwards due to wind |

 |
| F35 aside a B-17 |
 |
| A plane if designed by Salvador Dali |
Thursday, July 4, 2019
1/4" Dyneema Amsteel 12 Strand Eye Splice for Standing Rigging (Hobie 20)
[See Article on this Blog Titled" "Amsteel Dyneema Stretch"]
12 Strand Amsteel/Dyneema Eye Splice
https://www.youtube.com/watch?v=EjR4E_91txk
Brummel Splice
http://atlanticbraids.com/dyneema-brummel-eye-splice-1-end/
https://www.youtube.com/watch?v=d0B6tYTVHVM
2nd End
https://www.youtube.com/watch?v=fIR5JdQ7TEo
https://www.youtube.com/watch?v=IxSi8igfChk
https://www.youtube.com/watch?v=4WW7Qvg3VjI
Hobie Side Shroud Length: 23' 5 & 1/4" [7.14375m]
Additional Length Required for Splice: 1.5ft
Total Length required for 2 Eye Splices: 26.5 ft approximately.
Shrouds / Stay Length
https://static.hobiecat.com/2010_archive/support/pdfs/WireGuide.pdf
My measurements in meters / mm:
Side: 7.135m (7135mm) -> Shorter better to allow stretch and adjustment -- 6.8m
Fore: 6.335m (6335mm) -> Now measuring about 6m to have adequate tension
https://smallboatsmonthly.com/article/synthetic-fiber-rigging/
https://www.apsltd.com/aps-advisor/types-of-eye-splices-for-braided-line/
https://www.youtube.com/watch?v=_r-6pjTE3Qc
7/29/19 Update:
I've installed the stays and they were not exactly the same length, but close enough (a few inches) so that they could be adjusted by the side-hole adjuster. Next, I'm going to work on the forestay replacement as dyneema is much easier to work with.
9/16/19 Update:
Amsteel stretches 1 to 1.5 feet per 22 feet of 1/4" line.This must be taken into account when determining line lengths, and lashing adjustability shoudl be built-into the design for tensionning. I lash with 7/64 amsteel, use 1/4" Stainless thimbles (316) and take 4 lashes around for an expected strength of 4* 1600 lbs = 6400 lbs (2909 kgf).
10/4/19 Update:
See this article about how the rigging looks: http://porsche924s1987.blogspot.com/2019/09/dyneema-rigging-pictures.html
Saturday, May 18, 2019
Checkride Preparation
DPE Selection
https://www.aopa.org/news-and-media/all-news/2017/may/flight-training-magazine/checkride-selecting-examiner
Prepare to:
Know your airplane and all of its systems, including Autopilot if equipped.
Know your airspace rules and procedures (Charlie / Bravo radio acknowledgement, Bravo must be cleared into Bravo etc)
Know your night and day flying limitations. 90 day rule with landings for night flying etc.
Practice maneuvers such as steep turns, slow flight, stalls, approach descent and landing items.
Sunday, May 12, 2019
Aviation Parks and Land with Runways
America is unique in that flying from place to place is actually possible on your own. With roads filling with cars and congestion, the dream of taking to the air has never been so appealing than in 2019.
Links to Aviation Property:
California
http://www.aviationacres.com/californiaairports.asp
North And South Carolina
http://www.carolinaairparks.com/w_airstrips.htm
Oklahoma
http://airportproperty.net/airok.htm
Links to Aviation Property:
California
http://www.aviationacres.com/californiaairports.asp
North And South Carolina
http://www.carolinaairparks.com/w_airstrips.htm
Oklahoma
http://airportproperty.net/airok.htm
Thursday, May 2, 2019
Stage 7 Check C172SP
--> Clearing Turns [Always do them]
--> Set Flight Following before Taxi.
--> Use Taxi Diagram
--> Briefing
Engine Failure in Flight
Vg 68. Best GlideSpeed
Fuel Shutoff - In
Fuel Selector - Both
Restart (if time/altitude permits)
--> Aux Fuel Pump - On, Mixture - Enrich, Ignition Switch Both
--> Start (if Prop stopped)
--> Aux Fuel Pump - Off (if restarts)
Check Fuel Flow, if Zero Aux Fuel Pump back on
-> Airspace Categories. C and D require 2-way radio contact to enter. C requires also Mode-C Transponder.
-> Pilot and Equipment Requirements
-> Bravo (B) Airspace requires explicit "Clear into Bravo"
Special Use Airspace.
-> MTR - Military Training Routes
-> WARM-PC. Warning, Alert, Restricted, MOA, Prohibited, Controlled-Firing Area.
Restricted: Unusual often invisible hazards such as aerial gunnery or guided missiles.
Flight Systems:
-> KLN94 GPS
-> Autopilot Usage
Cessna 172SP Airspeeds:
Vspeeds
40-Stall speed full flaps
48-Stall speed no flaps. "Clean Configuration"
55-Rotation Speed no flaps. "Normal Takeoff"
62-Vx Best Angle of Climb for obstacle clearance
68- Vg Best Glide Speed
74-Vy Best Rate of Climb
105- Va. Maneuvering Speed at Max Gross Weight.
110- Vfe. Flaps 10 Max Speed to deploy Flap 10 Deg.
129- Vno. Max Structural Cruising Speed. Beginning of Yellow Arc.
163- Vne. Never Exceed. Red Line on Airspeed Indicator.
Airspeed Indicator
40-85 White Arc: Full Flap Operating Range
48-129 Green Arc: Normal Operating Range
Weather
https://www.cfinotebook.net/notebook/weather-and-atmosphere/weather-fronts
Ice Pellets on surface indicate: Temperature inversion with rain falling through colder air which then freezes during its descent as ice pellets.
Thunderstorms can form on warm & humid days.
Top reaches 40,000 feet or more. --> Cannot climb over.
Supercell - Tornadoes can result.
Multicell - also called Squall Line. Multiple Thunderstorms
https://www.faa.gov/documentlibrary/media/advisory_circular/ac%2000-24c.pdf
Mature Phase- both up-drafts and down-drafts. Microbursts are down-drafts.
Anvil Cloud of Thunderstorm
https://www.weather.gov/iln/skywarn_guide
Lenticular Clouds
https://en.wikipedia.org/wiki/Lenticular_cloud
Altimeter Setting
-> If not available, adjust to departure airport.
Approach
-> Pilots of inbound aircraft should monitor and communicate 10 miles out
Airspace
https://www.faasafety.gov/files/gslac/courses/content/25/185/vfr%20weather%20minimums.pdf
VOT
http://www.askacfi.com/3681/vot-vor-test-facility.htm
Preventive Maintenance:
https://www.cfinotebook.net/notebook/rules-and-regulations/preventative-maintenance
Questions
FAA advisory circulars containing subject matter specifically related to Airmen.
60
--> Set Flight Following before Taxi.
--> Use Taxi Diagram
--> Briefing
Engine Failure in Flight
Vg 68. Best GlideSpeed
Fuel Shutoff - In
Fuel Selector - Both
Restart (if time/altitude permits)
--> Aux Fuel Pump - On, Mixture - Enrich, Ignition Switch Both
--> Start (if Prop stopped)
--> Aux Fuel Pump - Off (if restarts)
Check Fuel Flow, if Zero Aux Fuel Pump back on
-> Airspace Categories. C and D require 2-way radio contact to enter. C requires also Mode-C Transponder.
-> Pilot and Equipment Requirements
-> Bravo (B) Airspace requires explicit "Clear into Bravo"
Special Use Airspace.
-> MTR - Military Training Routes
-> WARM-PC. Warning, Alert, Restricted, MOA, Prohibited, Controlled-Firing Area.
Restricted: Unusual often invisible hazards such as aerial gunnery or guided missiles.
Flight Systems:
-> KLN94 GPS
-> Autopilot Usage
Cessna 172SP Airspeeds:
Vspeeds
40-Stall speed full flaps
48-Stall speed no flaps. "Clean Configuration"
55-Rotation Speed no flaps. "Normal Takeoff"
62-Vx Best Angle of Climb for obstacle clearance
68- Vg Best Glide Speed
74-Vy Best Rate of Climb
105- Va. Maneuvering Speed at Max Gross Weight.
110- Vfe. Flaps 10 Max Speed to deploy Flap 10 Deg.
129- Vno. Max Structural Cruising Speed. Beginning of Yellow Arc.
163- Vne. Never Exceed. Red Line on Airspeed Indicator.
Airspeed Indicator
40-85 White Arc: Full Flap Operating Range
48-129 Green Arc: Normal Operating Range
 |
| Source: https://forums.x-plane.org/index.php?/forums/topic/153898-cessna-172-airspeed-indicator-grey-arc-at-bottom/ |
https://www.cfinotebook.net/notebook/weather-and-atmosphere/weather-fronts
Ice Pellets on surface indicate: Temperature inversion with rain falling through colder air which then freezes during its descent as ice pellets.
Thunderstorms can form on warm & humid days.
Top reaches 40,000 feet or more. --> Cannot climb over.
Supercell - Tornadoes can result.
Multicell - also called Squall Line. Multiple Thunderstorms
https://www.faa.gov/documentlibrary/media/advisory_circular/ac%2000-24c.pdf
Mature Phase- both up-drafts and down-drafts. Microbursts are down-drafts.
 |
| Source: https://www.weather.gov/iln/skywarn_guide |
Anvil Cloud of Thunderstorm
https://www.weather.gov/iln/skywarn_guide
Lenticular Clouds
https://en.wikipedia.org/wiki/Lenticular_cloud
Altimeter Setting
-> If not available, adjust to departure airport.
Approach
-> Pilots of inbound aircraft should monitor and communicate 10 miles out
Airspace
https://www.faasafety.gov/files/gslac/courses/content/25/185/vfr%20weather%20minimums.pdf
VOT
http://www.askacfi.com/3681/vot-vor-test-facility.htm
Preventive Maintenance:
https://www.cfinotebook.net/notebook/rules-and-regulations/preventative-maintenance
Questions
FAA advisory circulars containing subject matter specifically related to Airmen.
60
Tuesday, April 30, 2019
924S Waterpump Bolts Sheared. Resources
8 Waterpump Bolts and 4 studs, length 45mm.
http://www.mcmaster.com/#93275a014/=2qgbbj
50 mm M6 Studs for waterpump
Extractor also necessary if you can't back the sheared studs or bolts out.
These I purchased from Harbor Freight.
Left Hand Twist Drills can also work with drills that can run in reverse to remove bolts.
If your radiator is in place, you will need to use a short drill or angle drill. I found one at Harbor Freight for $30 which was excellent. Link to Drill.
In one case, my extractor itself broke. This required a carbide "burr" (search on Amazon) to be used with the drill to remove the hardened steel insert. The process was time consuming and led to the problem of "enlarged bolt hole"
For bolt holes which are too enlarged, I use Stanley Helicoil, a tap kit to allow stainless inserts to thread into oversized holes. My Helicoil (only 1 needed) was for M8!
Clean and re-clean the gasket surface, and use a new gasket with your new waterpump. My replacement came from URO on Amazon.
Thursday, April 11, 2019
Flight School Acronymns
Learning to fly has never been more full of more useless acronyms than today.
Five P's (SRM)
Plan
Plane
Pilot
Passengers (not that this one is second to the last!)
Programming
Three (More) P's (ADM)
https://www.faa.gov/regulations_policies/handbooks_manuals/aviation/media/faa-h-8083-2.pdf
Perceive
Process
Perform
WARMPC? Who comes up with this stuff?
W – Warning Area
A – Alert Area
R – Restricted Area
M – Military Operations Area (MOA)
P – Prohibited Area
C – Controlled Firing Area
N – National Security TFR
ALERTS? [Ok this one is somewhat useful]
A - Airspeed - Maintain best glide speed. 68 Knots in the 172SP
L - Landing site - Locate.
E - Engine. Restart if time permits.
R - Radio - 121.5 Mayday Mayday Mayday Tail Number
T - Transponder - Set to 7700 = emergency
S - Seatbelts - Ensure they are secure
IMSAFE?
I- Illness
M- Medication
S- Stress
A- Alcohol. None within 8 hours of flight. [Airports are conveniently full of bars as are hotels that all Pilots stay...]
F- Fatigue [Crew scheduling makes sure that pilots are fully utilized. This is a controversial one.]
E- Emotional Issues and/or Eating enough!
A TOMATO FLAMES? [VFR Daytime Required Equipment]
Anti Collision Light System (part of preflight check)
Tachometer
Oil Pressure
Manifold pressure
Airspeed Indicator
Temp Gauge
Oil Temp Gauge
Fuel Level Indicator
Landing Gear Extend/Retract indicator (if applicable)
Altimeter
Magnetic Compass
ELT
Saftey Belt
NWKRAFT? [14 CFR 91.103]
Notams
Weather
Known ATC Delays (uncommon)
Runway Length
Alternates
Fuel
Takeoff and Landing Distances
Decide Model
Detect
Estimate
Checklist/Choose
i
Do
Evaluate
PAVE Checklist
Pilot
Airplane
Environment
External
Saturday, April 6, 2019
924S Cooling System. Testing Why Radiator Fan Doesn't Come On
I lost the water pump at the end of a nice country-drive and had a long 100 mile tow to get home. (about $500!) With the water pump now replaced, I am not seeing the radiator fan come on unless I flip the air conditioning on.
Once the car is powered off, Coolant seems to be leaking from under the engine close to the water pump, but at a slow trickle. There is no sign of white smoke from the tail pipe or of frothy oil.
Facts:
-> During period that water pump failed, I continued to drive the engine "hot" to get to a safe place. I refilled the coolant once and then stopped a second time. After the tow, I didn't restart the engine until I had replaced the water pump. However, the engine tends to overheat and it seems that the coolant is not circulating. Fan Resistance: Drivers Side: 400 Ohm, Passenger's: 1300 Ohms.
-> When I replaced the Water pump and removed the M6-1.0 studs, most broke in their holes. I therefore replaced the studs with 1/4" 20 tpi stainless bolts. The torque spec used was lower, and the waterpump gasket seal may not have been torqued down sufficiently as a result. That would explain the coolant loss from around the waterpump gasket.
-> Following this Clark's Garage procedure, the fans can power on in both low and high modes.
http://www.clarks-garage.com/shop-manual/cool-01.htm
-> The thermostat was reused and not tested before assembly.
Next Steps:
-> Remove the water pump a second time, test the thermostat and check the gasket for signs of leakage. Use some sealant and correct torque spec for bolts and reinstall.
-> Bleed and Retest the Cooling System
Saturday, March 16, 2019
Tokyo National Museum
 |
| Stirrup embellished in a rather amazing 1800's Art Deco-esque style including a boat |
 |
| Can't read this, but it's beautiful. |
 |
| Shrine outside of the Ueno Park area surrounding the Museum. |
Sunday, March 10, 2019
Trump is the "White Hat" Hacker of US Democracy
So-called "White Hat" hackers get paid to expose flaws in computer systems to the public. I would like to generalize their scope to include hacking democratic institutions, Mass Media, and FaceBook.
"White Hats" employ their skills to uncover security risks to the customers that hire them. Little did we know in the Fall of 2016, that together with Steven K. Bannon, billionaire donors, and further aided by commercialized social surveillance systems enthusiastically prepared for exploit by Mark Zuckerberg (Facebook), that America's democracy itself was about to be exposed to one of the most uncontrolled and bizarre experiments in her short history -- a public hacking of democratic institutions in full view, exposing the flaws of human nature, Politics, Mass Media and our Democratic systems.
The unexpected 2016 presidential result required a mixture of at least 3 ingredients:
(1) The US "Pay-to-Play" political system.
(2) The "Corporate Media Machine" co-opted for entertainment.
(3) Unchecked exploitation of social surveillance (ie Facebook)
The above ingredients explosively combined to propel a perhaps unwilling administration to the US Presidency. Let's begin with the pay-to-play political system. In 2016 there was a groundswell of support for an authentic grassroots effort to displace the status-quo in Washington. The backdrop consisted of disillusionment with Obama following two terms in which "Change" didn't materialize for wide swathes of the US that continued to de-industrialize in absence or real support from Washington. Backers of Bernie Sanders organized and challenged the well established Clinton camp in an ultimately unsuccessful bid for the Democratic nomination. At the Democratic Party convention, Clinton was nominated based on SuperDelegates, an opaque and biased element of the Party apparatus that favored Clinton based on pay-to-play politics, and that ultimately backfired in the General Election.
At the same time that the Democratic Party was being divided, the Republican party was attempting to nominate a traditional establishment candidate along the lines of Cruz, Rubio or Bush. During this time what I refer to as the "Corporate Media Machine" (along the lines defined by Chomsky in Manufacturing Consent) was ramping up Media coverage of long-shot candidate Trump in exchange for massive commercial gain due to boosted ratings. This candidate was known to the public from decades of scandal, countless interviews including public musings of a presidential bid, and a run of reality TV programming. The candidate was both well aware of the hypocrisy of the media and also of how to benefit from it. In fact, at almost every turn, during grassroots rallies and TV interviews, he spoke directly to Media executives about the ratings that he personally was providing for them. The media continued to keep cameras trained on Trump all the way through. In summary, the candidate was already well positioned to exploit ingredients (1) and (2). The trigger of this explosive combination of ingredients was provided by the Alt Right figure of Stephen K. Bannon, aided by ingredient (3): the unchecked exploitation of Social Media which I redefine here as Social Surveillance (eg Facebook).
Social Surveillance (eg FaceBook) had greatly aided campaigns before -- just take a look at Obama's back-to-back successes utilizing the enormous platform. In the 2008 and 2012 elections, the $800M and $1B cash pile that the campaign brought in was provisioned to leverage systematic targeting and influencing of voters. Looking outside of the US, the same platform was widely lauded for toppling regimes in Egypt and Tunisia during the Arab Spring. Little thought was given at the time at the implications of the technology on our home shores. Anyone who doubts how surveillance-oriented FaceBook is should read comments by NSA figures and those who actually designed and implemented the software -- without a doubt it was and is intended to vacuum up, store and distribute it's users personal information, usually unbeknownst to them, for the purposes of monetizing it. The fact that the data was "weaponized" was coincidental. The practice continues to this day until the public decides to leave the platform en-masse.
Much more can and should be said about the three ingredients above which combined explosively to unwittingly propel a narcissist property developer to the US presidency. What is important is that "White Hat Hack" occurred out in the open and in public exposing deep flaws in our human nature, our corporate and media systems and pay-to-play political process that fails to support truly democratically elected candidates such as Sanders. What is left for us to do now is to impose checks on our human nature, our technology (as is done more widely in Europe today) and our Politics, Corporations and Mass Media. In the case of November 2016, and the ensuing years the phenomena has been laid bare in a way that I hope will harden our democracy's defenses and prepare my generation to see the pros and cons of our connected world and our ever tribal tendencies.
I would like to hear your thoughts on this brief article in the comments section below.
 |
| Image: https://www.perthnow.com.au/business/ceos/republicans-ted-cruz-and-john-kasich-team-up-in-stop-trump-deal-ng-66a20154f4b478bf6e677a6db10c9e66
Downloadable Version (PDF):
|
Saturday, January 5, 2019
Hobie 20 Boat Trailer Design. Part's List. Procedure. Rough Cost.
I am replacing two rusted-out cross bars of my Hobie 20 trailer.
Below is the list of parts and costs associated with the trailer upgrade.
The original Calkins Trailer had 2x3 inch steel rectangular cross bars with welded steel tabs. The tabs had holes to accept 2" U-Bolts. They are 8 ft long.
My design uses 2 Aluminum 2x3x 0.125 inch cross sections and instead of welding tabs, I will use a bolted connections to Aluminum Angle Brackets.
The new 50mm M8 "Square" U-bolts are Stainless and ordered from Amazon. As with most things Amazon, they originate from China, but are decent quality and include the M8 Hex nuts and a straight piece.
Procedure:
(1) I ordered the 2 eight foot crossbars and 24" of aluminum angle online.
(2) I fabricated the brackets to connect the crossbars from 2x2x 0.125 inch 6061 T6 Aluminum Angle.
(3) The Angle was cut to length on my Mitre Saw running a Carbide Tipped 10" Blade from Hitachi. I drilled the holes for M6 Socket Head Cap Screws to attach to the cross bars and M8 U-bolts to attach to the trailer 2x3 inch frame.
(4) I have yet to assemble everything due to the weather this weekend. More to follow and photos during assembly.
Below is the list of parts and costs associated with the trailer upgrade.
 |
| Hobie 20 Trailer Redesign: Pink lines represent the two new Aluminum Crossbars |
The original Calkins Trailer had 2x3 inch steel rectangular cross bars with welded steel tabs. The tabs had holes to accept 2" U-Bolts. They are 8 ft long.
 |
| Original Trailer front cross bar. Welded tabs which accept 2 inch U-Bolts. |
The new 50mm M8 "Square" U-bolts are Stainless and ordered from Amazon. As with most things Amazon, they originate from China, but are decent quality and include the M8 Hex nuts and a straight piece.
Procedure:
(1) I ordered the 2 eight foot crossbars and 24" of aluminum angle online.
(2) I fabricated the brackets to connect the crossbars from 2x2x 0.125 inch 6061 T6 Aluminum Angle.
(3) The Angle was cut to length on my Mitre Saw running a Carbide Tipped 10" Blade from Hitachi. I drilled the holes for M6 Socket Head Cap Screws to attach to the cross bars and M8 U-bolts to attach to the trailer 2x3 inch frame.
(4) I have yet to assemble everything due to the weather this weekend. More to follow and photos during assembly.
Subscribe to:
Posts (Atom)